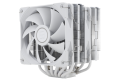
13. Montaggio – Tuniq Propeller 120

Stessa procedura anche per Propeller 120, posizioniamo quindi il backplate e serriamo le viti passanti. Fate attenzione a far corrispondere la sporgenza delle viti con la tacca dei fori: la cosa impedisce così che il perno ruoti una volta serrato a fondo.


Arrow - Venomous X - NPH-105 - Propeller 120 testa a testa ... 13.Montaggio - Tuniq Propeller 120 1 

Arrow - Venomous X - NPH-105 - Propeller 120 testa a testa ... 13.Montaggio - Tuniq Propeller 120 2 


Arrow - Venomous X - NPH-105 - Propeller 120 testa a testa ... 13.Montaggio - Tuniq Propeller 120 3 

Particolare delle viti passanti. Tra la scheda madre ed il dado è necessario frapporre una rondella in cartone adesivo (in dotazione). Sinceramente avremmo preferito una soluzione differente. Una rondella in teflon o altro materiale plastico, avrebbe assolto alla stessa funzione con una maggiore durata nel tempo.


Arrow - Venomous X - NPH-105 - Propeller 120 testa a testa ... 13.Montaggio - Tuniq Propeller 120 4 

Arrow - Venomous X - NPH-105 - Propeller 120 testa a testa ... 13.Montaggio - Tuniq Propeller 120 5 

Arrow - Venomous X - NPH-105 - Propeller 120 testa a testa ... 13.Montaggio - Tuniq Propeller 120 6 

Ancora alcuni particolari del sistema di serraggio.


Arrow - Venomous X - NPH-105 - Propeller 120 testa a testa ... 13.Montaggio - Tuniq Propeller 120 7 

Arrow - Venomous X - NPH-105 - Propeller 120 testa a testa ... 13.Montaggio - Tuniq Propeller 120 8 


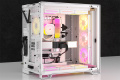
Operazione ultimata!